This is a basic writeup on solar systems. First off I’d like to share my basic mentality on the subject. After the philosophical mentalities we’ll go into common terminology and some components. We’ll end with an example configuration with the majority of the needed components and prices at the time of this writing (2026). This is a reference and basic guide on ideas and principles I wish I knew before getting started. I’d recommend reading a book or three to get further understandings before you get going. If you don’t like reading too much, this document can get you started, but at least read the manuals to the components you buy and follow their instructions.
At this point it seems fairly silly to me to go “off-grid” and build a solar system if you do not want to change your lifestyle to some extent. Unless energy prices skyrocket, or you live in an area with very high prices, it does not seem worthwhile to build the massive solar panel arrays and the huge battery banks necessary to supply power to the typical household. The economy of it all just takes too long to pay off, in some cases it cannot pay for itself over time unless you stay tied to the grid as your primary battery bank – which is not off-grid and beyond the scope of this writeup. But if you can alter your lifestyle some and switch some things around you can go off-grid and save a lot of money. I recommend to people to go with 12 or 24 volt systems with 800-1600 watts or so in solar panels. If you can live with this, then you certainly should go off-grid and you will save a lot of money over time. It is so nice being able to produce your own energy with only a 5-20 year bill for new batteries vs a monthly bill to stream power from a third party company. To do such a thing with a relatively low upfront cost is a great thing.
The amount of wattage the solar panels generate depends on the time of day as the sun arcs through the sky, with midday being full strength. Our family is running on a 12V system with just over 1000 watts in solar panels, but our charge controller utilizes only 800 watts. This makes it so we get full strength wattage for more hours of the day which is nice. If you can go with 12V I highly recommend it. With 12V there are countless accessories to attach that are built for RV’s, boats, or cars since many of those run on 12V. With 24V there are also many RV and boat accessories as well, but not as many as you will find with 12V. Another option if you go with 24V is to get a DC-to-DC converter which can change the voltage to whatever you want (depending on the converter). So if you go 24V you can down drop to 12V for all of those neat low-priced attachments anyway, or if you are at 12V you can increase it to 24V or beyond. The converters are typically more efficient than an inverter bumping up to AC (alternate current, what a typical house uses for power) 120V and/or 240V. So consider this as an option if you want to build a very efficient system with minimal loss, which is pretty important with a smaller system like I’m recommending here.
It can still be worthwhile to go off-grid with a 48V system hitting something like 3200-5400 watts (give or take depending on charge controller capacity and your solar array). But your amortization will take quite a bit longer and in some instances it will not pay for itself over time. Today you can even get 72V systems, 600V systems, and beyond that but I do not recommend going this route and will not cover anything that helps you much in that direction. I also do not think it’s all that awesome to connect to the grid with a solar system. To me one of the primary points is to be more self reliant and discontinue your monthly bill. So I’d recommend going to other sources if your desire is to get a lot of panels and hook up to the grid as your battery, that isn’t a terrible idea in the city, but for rural folk I’d recommend pulling the grid plug. I had a friend who ended up spending well over $50,000 for their solar system and were still hooked up to the grid, but their monthly bill was very low, usually $0. This is a writeup to help people disconnect from the grid and live with less power overall to save money and be more self sufficient. Another smart option for those who stay connected to the grid is to just make a simple 12V side system. It will not run your whole house when the power is down but you could have an efficient chest freezer, charge batteries (laptops, power tools, phones, rechargeable lights etc.), run lighting, and more. This makes it so if the grid goes down for an extended time you aren’t completely incapacitated. Although this is not nearly as awesome as going off-grid in my view, it would be an intelligent thing to do for those who cannot take the leap away from the grid.
My wife and I are not experts in this. She mostly avoids it, but likes that I’ve dug in so we can utilize this tech and have some electricity in our life. We wanted to go off-grid for over a decade now but realized how challenging it would be. We had a house that had many high-power consumption appliances and it seemed almost impossible for us to afford the solar system needed to power that. So we started playing around with my father-in-law’s tool “Watts App Pro” to see what each appliance used for power. We started deciding what things we could get rid of and what we could keep. After analyzing all of it we calculated that it would take about an $8,000 to $12,000 system or so to get off-grid and stop our monthly bills. To do that we needed to replace some of the highest power draws. We were planning on getting rid of our electric water heater and switch to wood for winter and propane or oil for summer. We planned on swapping our electric stove for a propane one. Our refrigerator was already super efficient so that could stay. We were also thinking of getting rid of our big gaming computers and switch to laptops. As time went on we had an opportunity to move to a new place and build from scratch. This made it easier to plan from the ground up a more efficient setup. We now have a system that cost about $4,000 because we thought of it from the ground up, instead of adopting it to a house already built for us depending on electricity for so many things.
I’m no electrical expert. I was very nervous about this early on. I was almost ready to just opt into using one of those all-in-one systems that I wouldn’t have to think about. A solar panel, and a box of mystery that you plug the panel into and plug appliances into. But the problem with those is that it’s difficult to swap one component inside that box and they are way overpriced for what you get. Once the battery goes out you often need a new system – seems pretty silly. You may be able to swap batteries with some of them, but the ones I was looking at didn’t have that as an easy option. Note that the all-in-one systems I’m talking about here are not kits with all of the separate components needed. Sometimes those can be a good deal and worthwhile. I’d recommend, even if you are nervous like I was, to build a system from scratch. Don’t buy an all-in-one unit, you will spend more and have less control over it. Sure they are easy but you can figure this out. I did! And it was really a mystery to me until well after I built the system. It was actually running and working well before I learned all that much about it. I’d recommend reading a few books on the subject. I think you would be better off by doing so. I read the books listed at the bottom of this writeup after the system was up and running and I was pretty clueless. Point being, you can do this – but don’t do what I did – become a little more informed with this and read a book or three so you know what you are doing. Even with a 12V system you can hurt yourself or burn down a building. However, if you build the system following sound principles it is extremely safe. If you are going with a very large system it seems best to put the battery bank outside in a small insulated shed. This isn’t a terrible idea even if you go with a small system, so if the worst case happens it won’t burn your house down. I’m not saying this to scare you from switching to solar, just to be cautious. A little precaution can save you a lot of heartache. The grid burns down many houses as well, you aren’t safe just because you don’t go this route. Electricity can get hot and make fires especially when things short out. (Fuses and breakers help prevent this.)
To me the most important thing to those desiring to go off-grid is to prepare for a shift in lifestyle. This shift might be minor for some, and major for others. The most inefficient thing you can do with electricity is convert it into heat. Don’t think of your solar system as a heating system. The more you can avoid it as refrigeration and air conditioning the better as well. But it can do some of that if you find that a necessity. With a more robust solar system it might even be worthwhile to use it for heating and water heating for a dump to utilize excess wattage. But if you can go with a lower watt system you can save a lot of money and still have power to run many things. Our family has no refrigeration at this time. One of the main things I wanted early on was a solar system that can power a refrigerator and chest freezer, but after living without it for a while my wife and I agree those are totally overrated. We thought we had to have it for our cow’s milk, but it turns out that’s the worst thing you can do with raw milk for health benefits (read ‘Milk Into Cheese’ – by David Asher for details on this). We plan to make a root cellar (doubling as a cheese cave) and maybe an ice house someday if that isn’t enough. However right now we are doing fine so we’ll probably skip the ice house. We heat with wood and built with intelligent passive solar design to keep from needing air conditioning. A basic 12V ~800 watt system could easily run an efficient refrigerator, and window A/C unit if that is very important to you. However it could struggle if they aren’t very efficient. A larger 24V ~1600 watt system could run an efficient refrigerator, chest freezer, and a window air conditioner if that is what you care about. However if you can move away from refrigerators and freezers you can downsize your system and save a lot. We preserve a lot of our food with canning. That uses a burst of heat and some jars and then you are done – no more power needed. There are also cellars, fermentation, drying, salting, jellies, and other preservation methods available to store your foods. I think it very reasonable to have one efficient refrigerator for daily use and one efficient chest freezer for storing veggies and/or meats. You can also store a lot of meat through canning; it works especially well with ground meat – that is what we do.
If you can get away from using your solar system as a heat source you can get away with a much cheaper/smaller system. Get a wood, propane, or natural gas cookstove not electric. Skip the microwave (although even a basic 12V system could run one for short periods). Use wood or propane for space heating, not electric. Clothes dryers can use insane amounts of power, don’t bother with those. If you cannot live without one switch over to a propane version. You can dry clothes outside even in freezing winter temps, it just takes longer. I thought that was not true and insane when I first found out – so I tried it. Guess what, it works! My grandparents hung their clothes downstairs, air is an effective dryer and clothes last longer when they aren’t cooked in a dryer. Also consider getting rid of any old power hogs you may have around and upgrade to more efficient versions. Another option is to use a generator to supplement power for any big items you may use infrequently. This is a very common practice in the off-grid world, especially during cloudy weeks. You may want a generator to top off batteries mid winter with long overcast periods to keep your batteries healthy. We don’t need to because we have lowered our power use to a very low level, and you could to, but if you don’t that is an option.
Solar System Terminology With Some Basic Helpful Math Formulas
Ampere (amps): One ampere is equal to one coulomb of electrical charge per second. One coulomb is equal to about 6.241x10¹⁸ electrons passing through a single point in the circuit each second. If that is as abstract to you as it is to me then welcome to the party. The basic thing I understand is that amps are a measurement of current. It’s easier to me to think of it as flow. Even though it isn’t really a direct correlation it is similar or a metaphor thinking of it as the flow of water through a pipe (wires). If the pipe is huge a lot of water can flow through (current) even with low pressure (voltage), and it if it very narrow only a small amount can flow at a time. Realize this is not exactly what is going on because physics are very strange, but this concept can help you to make a functional system. The more amps going through the wire, the thicker that wire has to be. If your wire is too narrow it will heat up and can start a fire (larger wires and fuses can fix this potential problem). The higher the amps the shorter you want that wire to be. If you need a very long run of wire it is helpful to increase the voltage and decrease the amperage – that is why AC power became the norm in the economy of the world. With DC typically you have lower voltage and higher amps. With that it is very useful for small scale home and shop situations, but if you want to capitalize with maximum profits from central energy cartels you want to distribute power over long distances. To run long distance you want lower amps and higher volts which favors the AC systems. So when you build your solar system you want to keep the majority of your DC components, especially the high amp ones, as close as possible.
Volts: One volt is the potential difference between two points as one joule of energy is expended per one coulomb of charge moving between them… In other words it is the potential difference across a conductor carrying a constant current of one ampere that dissipates one watt of power… In other words pasture-raised sheep cheeseburgers are equal to the circumference of the yumminess contained outside the realm of possibilities when fluctuated flatulently into the multiverse multiplicated quantumly bounced from point to point and back again. Are you as lost as me? Don’t worry too much because Einstein was as well, and Copernicus never even came close. Functionally, although still more of a metaphor, I like to think of voltage as the pressure or force pushing the electricity through a circuit. If high amps require large pipes (wires) then you can think of the volts as the pump pushing the electricity through the pipes. Realize this is not truly the case, but thinking of it like this you can make your solar system function. The higher the volts the higher the pressure which will lower the amps. It’s sort of like a high pressure washer hose. You can have a lot of power going through a tiny little hose nozzle if the pressure is high enough. If you have a 2” pipe with 200 PSI you can pump about 600 gallons per minute through that. With 1 PSI it takes a 6” pipe to flow about the same amount of water through. Higher amp with lower volts is similar to the large pipe gushing water out with low pressure. Thinking of it like this is helpful in my mind. If you go with a 12V or 24V system you will want to do short runs with thick wires to gush your electricity around. Once you hit your inverter (high pressure pump), you can shrink the wires (although you need very large wires from your battery to your inverter) and use the tiny AC wires with high pressure to power your high 120V appliances. Hopefully that makes enough sense. And even if it doesn’t make sense then go eat a sheep cheeseburger, read your manuals, and you can likely make your solar system function. Or if you are vegan go eat a salad, read your manuals, and you can likely make your solar system function.
Wattage (watts): This is your electrical power, the combination of volts and amps. Watts measure the rate at which electrical energy is used, generated, or transferred per second. One watt is equal to one joule per second and is calculated by multiplying voltage by current (amps). Basically if you are trying to figure out watts you multiply amps and volts. A 12 volt 10 amp charger, appliance, or whatever will be using 120 watts (12 x 10). A 12 volt 2 amp charger or whatever will be using 24 watts (12 x 2). A 120 volt 1 amp charger or whatever will be using 120 watts (120 x 1). A 120 volt 10 amp charger or whatever will be using 1,200 watts (120 x 10). Many appliances, chargers, tools, solar panel and whatever will have a sticker showing either watts, volts, and/or amps used. This is a very important concept that can help you figure out what size of solar system you actually can live with. Related to this is kWh which is kilowatt-hour. This is how your electrical bill will be represented. What this means is 1,000 watts run for one hour. If you have 500 watts running for one hour you will be using 0.5 kWh and if you have 2,000 watts running for one hour you will be using 2 kWh. If you are using 100 watts over 24 hours you will have used 2.4 kWh. Realize that some appliances do not run non-stop. A refrigerator for example runs 20% to 30% of the time, so you would multiply your wattage use by about 0.25 and then multiply it by 24 (hours of the day) to get an estimate of a day’s use. Hope that all makes enough sense. In very hot conditions the refrigerator can run a lot more of the time, which is another thing to consider. Read the books referenced to get more details.
Amp Hour: Batteries for solar are typically labeled in amp hours. Some will be in kWh (Kilowatt hour) and some are labeled with both. To get the kWh from the amp hours simply multiply the voltage rating and the amp hours together. A 12V 200Ah battery can use 1 amp at 12V for 200 hours, or 10 amps at 12V for 20 hours, or 200 amps at 12V for 1 hour. Although your battery discharge rate may not be able to handle 200 amps, but you get the idea. Going with kWh can be easier in some regards because the voltage does not matter. And in a solar system often you will be running things at different voltages. With the above example you would have 2.4kWh (12V x 200Ah) or 2400 watts to use over an hour. So if your laptop used 150 watts and you had it plugged in for two hours you would use 300 watt hours or 0.3kWh bringing your battery bank down to 2.1kWh. In reality you get some loss through all of this, which is especially true when you go through an inverter. We’ll go over the losses in a little more detail later on.
Series: With any circuit you can run things in parallel and series. The most important thing for us to realize is what happens with solar panels and batteries. If you link the panels or batteries together in series you will be increasing the voltage but the amps stay the same. So if you link 6 solar panels together that are 25V and 10A you will have 150V and 10A coming out of that. If you linked together 4 batteries that are 12V and 100Ah you would have a 48V 100Ah battery bank. That battery bank would be a 4.8 kWh bank. In series all of the panels’ or batteries’ voltage will add up but the amps will stay the same. This setup is done by connecting the positive wires to the negative wires of the next panel or battery together in series.
Parallel: So now let’s pretend we went in parallel instead of series with the same system as above. With those 6 solar panels that are 25v and 10A you would have 25v and 60A coming out if linked in parallel. With the 4 batteries at 12V and 100Ah you would have 12V and 400Ah. The battery bank would still be a 4.8kWh bank. That is because your total wattage is still volts x amps which is still the same. In parallel all of the panels’ or batteries’ amperage will add up but the voltage will stay the same. This setup is done by connecting the positive wires to the positive wire/terminal and the negative wires to the negative wire/terminal of the next panel or battery together in parallel.
Solar String: If you connect four solar panels together in series (increasing the voltage) you are creating a “solar string.” Many systems will have multiple solar strings. They can be anything from 2 panels connected in series or many more.
Solar Array: The solar array is all of your solar panels connected together. Often this is multiple solar strings connected together. If you have two 400W panels connected together in series and then you connect four strings together you would have a 3200W array. The series connections would be increasing the voltage and the strings connected together in parallel would be increasing the amps. For easy math lets pretend those 400W panels are 40V 10A. Each string would be 80V 10A and when you combine all four strings you would have a 80V 40A solar array sitting at 3200W (400 x 8 panels or 80V x 40A = 3200W).
Battery Bank: You can have a solar system with zero or many batteries. Solar systems with no batteries are typically used for things like water pumps into cisterns and pond aerators. For a home or shop operation you would want at least one battery so your system runs smoothly when a cloud passes by and to have some function when the sun goes down. Our solar system only has one 12V 200Ah battery. You want to size the bank to your panels. If your battery bank is too large of a capacity for your solar array your batteries will never fully charge which will shorten the lifespan; lead acid batteries especially should be fully charged very regularly. Our battery bank is 2.4 kWh (12 x 200 = 2400) which tops off very quickly with our 800 watts of power coming from the solar panels. If our batteries were down to 50% it would take about 1.5 hours of direct sun to top them off. People often calculate that they have four to six hours of full sun to base their numbers off of. So we could have as much as a 4.8 kWh battery bank and our panels could top that off every sunny day. With a 1600 watt solar array you could double that to 9.6 kWh. With a 3200 watt solar array you could double that again up to 19.2 kWh battery bank. We’ll go over battery types and some details on them later on. Something for now is that with a lead acid battery bank you may want to double the capacity of what you think you’ll want. This is because you really ought to stay above 50% capacity always with lead acid type batteries. So 50% capacity means your useful kWh is cut in half. With Lithium Iron Phosphate batteries you can deplete down further, it’s recommended to stay above 20% to extend their lifespan but you can go down to 10% or even 0% with some brands without damaging them.
A battery bank can be wired in series which would be wiring positive terminals to negative terminals and negative terminals to positive. That will add your voltage together but your amp hours will stay the same. If you had two 6V 100Ah batteries you could link two of them together in series to give you a 12V system with 100Ah (total 1.2kWh). If you had four 12V 100Ah batteries you could link them all together in series to give you a 48V system with 100Ah (total 4.8kWh).
A battery bank can also be wired in parallel which would be wiring the positive terminals to the positive terminals and the negative terminals to the negative. This will increase the amp hours. So if you had two 6V 100Ah batteries and you linked them in parallel you would still have only 6V but the amp hours would increase to 200 (1.2kWh). This is not a typical voltage for solar home solar systems and wouldn’t work for most charge controllers so you would want to do series instead. If you had four 12V 100Ah batteries you could link them all together in parallel to give you a 12V system with 400Ah (total 4.8kWh). Notice that the kWh stays the same no matter the configuration of series or parallel. So if you have eight 12V 100Ah batteries connected in any configuration you will always end up with a 9.6kWh battery bank.
The solar array idea is also used with batteries. Let’s pretend you have eight total batteries running at 12V 200Ah in this system. Let’s say your charge controller can handle 3200 watts only if you run it at 48V, which is fairly common. So you have four batteries connected in series and all of them are doubled up in parallel. This would give you a 48V 400Ah battery bank with 19.2 kWh of use. If you had a 24V system with the same batteries you would have 24V 800Ah with the same 19.2kWh of battery use. If you had a 12V system with the same batteries you would have 12V 1600Ah with the same 19.2kWh of battery use.
Discharge Rate: Your batteries will have a discharge rate, which is the amount of amps that can continuously leave the battery. Some also have a “surge discharge rate” which can go higher for a short period of time – this helps to start large motors and such. This will either be rated in amps or labeled as the letter C and would be called the C discharge rate. A 200Ah battery that can discharge at 1C would be able to be powering 200amps continuously and be drained to 0 in one hour if used at that rate. If it were a 0.5C discharge rating it could use 100 amps continuously and be drained to 0 capacity in two hours. A 2C discharge rating could use 400 amps and be drained to 0 capacity in 30 minutes – you get the idea I hope. Our battery has a 2,000 five-second amp surge capacity and then 60 amp continuous capacity for discharging, which is decent (and equal to 0.3 C discharge rate). What that means is we can run at 720 watts (60 amps X 12 volts) continually. With many batteries you can double your discharge rate by putting two together in parallel. Check up on your battery details from the manufacturers writings, or sometimes the information is printed right on the battery. When our current battery dies we might switch to a higher discharge rate battery or put two together. It would be nice to have the capacity to run at ~1500 watts for longer durations. With our AGM battery from what I understand is that you physically can run continuously above 60 amps but the higher you go above that the more long term damage you are doing. So if we ran 2,000 watts from our inverter for longer than 5 seconds (the surge period) we would slowly start degrading our battery. If we did this often we would greatly reduce the lifespan. With some batteries it can be much more risky, so check with your battery manufacturer to understand the risks.
Charge Rate: The charge rate is similar but is to charge the battery not discharge it. To follow the same example as above if your 200Ah battery has a 1C charge rate you could charge it with 200 amps continuously and it would charge to 100% from zero in 1 hour. If it had a 0.5C charge rating you could use 100 amps to charge it up to 100% from zero in 2 hours. If it had a 2C charge rating you could use 400 amps and charge it up to 100% from zero in 30 minutes and that would be a very abnormal battery. We can charge our battery with 60 amps continuously which makes it a 0.3C (60 / 200) charge rating. It is pretty normal to have a lower charge rating than discharge rating in a battery, don’t assume they are the same.
Solar System Components
The basic components of most solar systems are these:
- Solar Panels
- Solar Mount
- Charge Controller
- Battery Bank
- Inverter
- Wires
- Fuses
And often for a shop or home system you might want or need these:
- Shunt and Battery Monitor (recommended)
- Combiner Box (often needed, especially for large systems)
- DC to DC converter
- Electrical Distribution Box (Breaker Box)
- Bus Bar (Positive and/or Negative)
- Bolt on Fuse MRBF
- Fuse Block
- Power Pole or similar system
The solar panels are the generator of the system. Basically the sun photons hit the panels and create a chemical reaction which starts the flow of electrons into the circuit. Then the charge controller will send that power from the panels in the correct voltage to the battery bank to keep it healthy increasing the lifespan. From there you can run all sorts of 12V or 24V appliances and do-dads depending on how you configure it. Connected to the battery can also be an inverter which will convert the voltage from 12V, 24V, or 48V into 120V and/or 240V (in the USA) to run any of your regular appliances. All of this requires wires to connect everything together which is a very important part of this system. And it is very intelligent to add some fuses in your system to decrease the risk of fire. There are also other components which may be needed or desired depending on how you build your system. I ended up using a combiner box to maximize our system and add breakers between the panels and charge controller. With the combiner box we were able to use three panels instead of two panels had we linked them in series. With the charge controller you need to stay within the parameters that the manufacture recommends. They will give you a voltage and amperage range, and with our system the voltage was too high with three panels. However the amperage was still fine with three. So we ran three single panels into a combiner box which boosted the amps, but not the volts keeping us within the charge controller ranges. This setup gives us breakers to protect the charge controller and maximizes the potential of our system running at 12V which is awesome. This charge controller can also run at 24V or 48V making it so we could add a lot more panels and batteries if we wanted to go this route. One of the benefits of going with higher voltage is your wire gauge can shrink. The lower the volts the higher the amps and the larger the wire needed. So if you go with 12V like we did, you really want to keep your primary components very close together. If you increase the voltage you can shrink the wires and have longer running wires. These are things to consider while building your system and is elaborated on in the recommended books.
Which type of panels should you get? At this time (2026) the most commonly used new installation uses monocrystalline solar panels. They have become a pretty solid choice for now with a good price point and efficiency of space used to watts produced. In the not too distant future keep your eyes out for perovskite solar panels. As they become more mainstream and the prices drop these might be the next most common panel with higher efficiencies. There are two other types used today which you may want to consider. The flexible panels (thin-film) are pretty good if you are mounting them on an RV or if you want them to be more sturdy against hail damage. However they typically are not built as well, have shorter lifespans, and shorter warranties. Many people have them die out within 10 years or so. So unless you really need it for some specific application I would not recommend them. Monocrystalline can last 30-40 years, and even longer – but the energy produced will slowly decline. The other viable option is the polycrystalline panels, they are a bit less efficient so you will take up more space for the same wattage output. I would only consider them if you get a very good deal, they are typically 15% to 18% efficient compared to 20%-25% with monocrystalline. Heterojunction cells (HJT) are also becoming more common, they are a type of monocrystalline n-type that is often hitting close to 25% efficiency. There are also PERC and solar tiles, search around on the internet for more info if interested. There are more but most of them have much lower efficiencies so they take up a lot of space, which is not too useful to the common DIY off-grid setup. There are other options and reasons to consider but we won’t go into them here.
Keep in mind, it isn’t the best idea to buy solar panels first without knowing your other components. It’s smart to at least theory build your system before buying parts. The charge controller might not function with some panels because of incorrect voltage or amp ranges. And you don’t want to get a battery bank too large where your panels cannot keep them charged up if you are going off-grid. If your battery bank is large enough that you likely cannot keep the batteries topped off during a bout of overcast, you will want a generator to top them off. It is smart to have your system built on paper before buying anything.
With solar panels shipping can really add up. It can potentially save you a good bit finding a good local seller and pick them up yourself. Or driving out to a warehouse if any are somewhat nearby that sell panels. Buying by the pallet can also save money in shipping. Just some things to consider. Also some extended warranties may only apply when installed by certified installers, something to look at when shopping around. There are many mid-range solar panels that can be pretty cheap and are still solid quality that will give you a long lifespan. There are a lot of people and companies that upgrade their solar every 10-15 years and you can buy used panels for very cheap sometimes. This isn’t a terrible idea, you can get 30-40 years or even more from a solar panel. So if you find the right deal just go check them out, if they are physically in good shape take a voltmeter to it and see if it reads close to what’s labeled on the back. It is smart to get all the same age, brand, and type of panel. If you see a stack of them with the top one exposed to the sun, that one is likely worn down more than the others behind it.
Here are a few websites to check out if you want reviews of some solar panel brands:
www.smartenergyusa.com - www.solarreviews.com - scorecar.pvel.com
online purchasing options:
www.solar-electric.com - www.altestore.com - www.santansolar.com - https://a1solarstore.com/ - www.signaturesolar.com
Which type of solar mount should you get? Typically people do a roof mounting system or a ground mounting system. There is also wall mounting, which is most useful in apartments and such. This is one part of the solar system that people may want to hire out if they are not very strong or skilled with building things. You also need to consider your roof orientation and pitch. Ideal is pointing south (in the northern hemisphere) and angled about the same as your latitude. If you are at 30-degree latitude and you have a nice 30-degree roof pointing south you are in great shape. If your roof is pointing east/west you will lose about 15% efficiency pointing to the west and 20% pointing to the east. If your roof is 45 degrees pointing to the south you will have more solar gain in the winter and less in the summer. Do not put panels on the north side (shade side); it is not worthwhile. Those are some things to think about with roof mounting. You can also get a roof mount with an angle adjustment to get a better angle. We went with a ground pole mount system which cost roughly $1200 all things considered. If you have a lot of space I’d recommend ground mounting. I don’t like drilling holes in my roof! We did do a roof mount for our solar pump pulling water from a nearby spring, but I don’t mind drilling holes in a little garden shed. The roof mounting can be a bit cheaper and faster since the structure is already there. One big perk to me about ground mounting is how much easier it is to clean the panels. In the winter I brush snow off of them and all I need is a shop push broom. My neighbors’ setup is fairly dangerous, walking along an icy platform brushing snow off isn’t my cup of tea. In higher wind areas make sure you get a mounting system with good wind resistance. Our top-of-pole mount kit was rated for about 120 mph wind, which should be plenty. Also we put our system in front of our shop (on the south/sunny side) which protects it from the prevailing winds from the north.
Some mounting options:
signaturesolar mount options - solar-electric mount options - Unistrut
Which type of charge controller should you get? There are two primary types available and I’d recommend going with the MPPT type, which stands for Maximum Power Point Tracking. You get about 20% less efficiency going with the older PWM type, which sands for Pulse Width Modulation. The MPPT type is somewhat more expensive but they will pay for themselves in power gained. I’d only recommend the old PWM types for very small systems, not for whole house or shop systems. Perhaps for a small shed that you use to pump water and charge power tool batteries it would be fine enough. But if you are making a more robust system that will be used for many applications I would highly recommend paying a little more for the MPPT type. Your charge controller is the brains of the operation. It will be taking the power flowing from the panels and sending that to your batteries. If you go with a very cheap charge controller you may end up paying more in the long run if it isn’t treating your batteries well. The battery bank is often the most expensive part of the solar system, so you want them to be charged correctly. A good charge controller will do that for you and most of them are very simple to install. Just plug the wires in and pick the settings for your battery type. Another thing with MPPT types is they are usually a lot more flexible with what voltage and amps come from your solar panels, with the PWM type you often have to make sure the panels’ voltage is close to what your battery bank voltage is. It is smart to settle on what charge controller you want to get and download the manual to be certain that all the other components you buy will be compatible.
Some of the top recommended brands would be MidNite, Morningstar, and Victron. We got the Morningstar TriStar MPPT-60 and are happy with it. Most people are happy with all three of these brands. You can find much cheaper charge controllers, but you may end up getting a lemon and if it’s too cheap you might really shorten the lifespan of your batteries which isn’t worth it in my view.
Midnite Solar - Morningstar - Victron
Which battery should you get? In my view there are two primary options, two secondary options, and two potential future options to keep an eye on. If you do not want to read much on batteries just read the first two types, those are what I would recommend with the options available right now. I’m going into a bit more detail here because what battery type you pick determines many other aspects of your system. You need to make sure your charge controller can charge the type of battery you pick. Also I think battery technology is pretty neat so I’ve read a lot on it and want to share some useful details with whoever reads this.
There are many brands for batteries out there, and you often get what you pay for. We got a mid-range Renogy AGM battery. I don’t expect it to last as long as the brands listed below. In each battery type I’ll link some solid brand choices for you to consider.
Top battery choices, I would recommend going with one of these first two primary options:
AGM (Absorbent Glass Mat) – This is a sealed lead acid battery and the type of battery we went with.
PRO’s
- Maintenance-free.
- Do pretty well in cold conditions. If you keep them charged up they can handle very low temperatures.
- Medium-high charge and discharge rates.
- Decently long lifespan. You can expect about 3 to 7 years from the typical AGM battery if used properly. The quality of battery and how you treat it can vary the lifespan significantly. There are some higher end batteries you can get closer to 20 years if you do not discharge them very much. This can work if you use the majority of your power while the sun is shining with a trickle of use at night.
- Not too crazy expensive. A 12V 200Ah battery can be from about $300 to $800 depending on quality and brand. The price can stretch outside of this range, but this is common.
- Easier to recycle than lithium in the USA.
- Very little to no off-gassing compared to FLA batteries.
CON’s
- Should not be discharged below 50% capacity, ideally stay much higher than that to really extend the lifespan.
- Heavy.
- When they start to die they can degrade pretty quickly.
- If used heavily and discharged often to 50% capacity you will only get about 500-600 charge cycles. However you can get well over 1,000 charge cycles (some over 2,000) if you do not discharge them below 80%.
- Overcharging can permanently damage the battery. It is important to have a decent charge controller with the correct settings to prevent this.
- Somewhat sensitive to extreme temperatures. The capacity of the battery is lower the colder it gets and it doesn’t like very high temps. Ideally you would want to keep them about 50-70 degrees for maximum lifespan and capacity use. However we have ours in a shop that gets very cold and so far it has held up fine. In extreme low temps it is smart to keep the battery closer to full all the time, the lower the charge the higher risk of damage. For example at -50 degrees if it’s at 30% capacity you will permanently damage it. At -50 degrees and above 90% capacity it should hold up well.
Solid brand options for AGM type batteries:
Rolls - Lifeline - Fullriver - Trojan - Crown
LiFePO4 (Lithium Iron Phosphate) – This type is becoming very popular for many reasons.
PRO’s
- Maintenance-free.
- Very safe compared to the lithium-ion types. I would not recommend lithium-ion batteries for solar, now that LiFePO4 has been refined there is no reason to go back.
- Very long lifespan. A quality LiFePO4 battery should give you 10-15 years if treated well. Typically you can get 2,000 to 8,000 charge cycles. The range is based on how low you discharge the battery before charging again. If you regularly drop it to 0% you’ll get the lower range, if you only go down to 50% you’ll get the higher range.
- You can discharge to 0% without destroying the battery, although to extend the lifespan it is highly recommended to only discharge down to 10% or even 20%. Keeping it above 80% you can get over 10,000 cycles.
- Many have built-in heaters so you can charge them below freezing.
- Much lighter than lead acid types.
- No off-gassing whatsoever.
- High to very high charge and discharge rates.
CON’s
- Higher upfront cost. However if you take into consideration the extended lifespan it can be cheaper in the long run than the other battery types. You can spend roughly $500 for a lower/mid quality to over $1,000 for a high quality LiFePO4 200Ah battery.
- Will be damaged if charging below freezing. If in freezing conditions make sure you get a self heating type or heat the area they are in. Many have a low temp cutoff to protect from damage even if it doesn’t self heat.
- More complicated internal components, if they malfunction your battery can die prematurely.
- Be sure your charge controller can handle this type of battery, many of the older charge controllers aren’t programmed to deal with this type. Some can be reprogrammed and some can use the gel battery setting decently.
Some budget to high end brands to consider:
WattCycle - Eco-Worthy - Vatrer - Epoch - EG4
Secondary battery choices, still worthwhile in some circumstances:
FLA (Flood Lead Acid) – This was the original standard for solar systems. Many people still go with this. I don’t really recommend this type because of the dangers and regular maintenance. However if you treat them well they will treat you well, there is a reason they are still fairly popular in the off-grid world.
PRO’s
- You can find pretty decent deals on these, sometimes half that of AGM batteries. People often used 6V golf-cart batteries which can have a decent price point. You can expect to pay roughly $200 to $800 for a 12V 200Ah battery depending on quality.
- Good lifespan. You can typically get a longer lifespan out of these than AGM if treated well. Expect 5-7 years on a mid quality battery and up to 15 or even 20 years from high quality “industrial” types.
CON’s
- Should not be discharged below 50% capacity, ideally stay much higher than that to really extend the lifespan.
- Regular maintenance required. You need to open the caps and top off the battery with distilled water. They require this more frequently as they age. They also off-gas explosive and corrosive hydrogen gas. They require venting and cannot be near any flames/sparks. If they explode you can have a nasty acid mess to clean up and potentially hurt people. The corrosion can build up on the terminal ends which will need cleaning now and then.
- You need to “equalize” the battery every 30-90 days (depending on manufacture recommendations) to prevent sulfation (build up of lead sulfate crystals). If you do not do this you will shorten the lifespan. Many good charge controllers can handle this for you automatically so it’s not a huge deal.
- Slower charge rate compared to the other types above.
- Not as resistant to cold as AGM
Solid brand options for lead acid type batteries:
Gel Deep Cycle Marine – another type of sealed lead acid battery
PRO’s
- Maintenance free.
- Good lifespan. You can typically get double the charge cycles out of these than AGM if treated well. The lifespan can be 5 to 15 years depending on quality and how deep you discharge them.
- Can be discharged well below 50% without permanently damaging them, they recover from a deep discharge much better then AGM and FLA.
- Not too bad on the price. Similar prices to AGM at roughly $350 to $600 for a 200Ah battery.
- Does well in hotter conditions.
CON’s
- More delicate to overcharging especially when cold. You need to make sure your charge controller can work with this type of battery or you can shorten the lifespan.
- Not as tolerant to cold conditions.
- Slower/lower charge rates and discharge rates.
Solid brand options for gel type batteries:
These last two are on-the-horizon choices. The first one is available now but they are newer tech and not quite ready in my view. They have high potential to become a great choice if the kinks are worked out. One I won’t go into but is similar to sodium ion is lithium titanate (LTO). They also have some potential with a very long lifespan, but have similar drawbacks as sodium ion and will likely stay expensive. The last option I’ll dig a little into is likely not to be readily available for some time (after 2030). You will see them in EV’s (electric vehicles) first, it might be a while before they are easy to get and affordable for the off-grid systems. Both of these are something to keep an eye on.
Sodium Ion – There is a lot of hype around this battery and in time might become a winner, but I don’t think it’s quite there yet.
PRO’s
- Sodium is a very abundant element and easier to refine. Once mainstream the costs could very well make it the cheapest battery choice.
- Much more environmentally friendly. Because of the abundance it does not require such destructive mining practices to obtain compared to lithium and lead. This will also be very easy to recycle.
- Safe.
- Some versions are maintenance free.
- Can be discharged down to 20% capacity, nearly as good as LiFeP04 batteries.
- Perform well at low temperatures, down to -50 degrees Celsius.
- Significantly lighter than lead acid batteries for the same energy, but not quite as light as LiFePO4.
- Good lifespan with about 3,000 to 5,000 charge cycles which should give you over 7 to 10 years. The lifespan may significantly increase as they refine the technology with new formulations. Some of the companies working on this tech are claiming 20,000+ charge cycles, which would be revolutionary – especially if they overcome some of the other drawbacks listed next.
CON’s
- Some versions require some maintenance such as periodic cleaning and topping off with distilled water (like FLA batteries).
- Overpriced for their performance right now since it is newer technology. Right now you can find them roughly $600 to $1,000 for a 200 Ah battery.
- Wide range in quality because they are newer tech.
- Currently slower charge and discharge rates
- Many charge controllers cannot charge them because they do not charge the same as the older battery types. If you get one of these make sure your charge controller can work with this type of battery. Some charge controllers can be programmed to custom settings which could be configured to work fine.
- Many inverters won’t work well with them because of the wide voltage curve. This means that you cannot use the full capacity of the battery with most inverters. It may turn out that these will work best with high voltage systems rather than my preferred 12V and 24V.
- At this point the “round trip efficiency” is pretty bad, which means the usable energy is low (60-80%) compared to AGM at 80-90% and LiFePO4 at 95-99%. In effect this means that you will need a 15-39% larger system for the same output.
- Like most new tech early adopters pay too much for mediocre products. In time this could revolutionize the battery industry, but that still seems like a maybe.
- If the battery becomes refined and awesome it is fairly likely that you will not be able to just drop it into your current system, you may need to upgrade some components.
I don’t know of any brands worth recommending, I think they will come soon enough though. Keep your eyes out for CATL, EVE Energy, Sunwoda, Gotion, and Haichen Storage sodium ion batteries; they all seem heavily invested in this technology. Gotion just made some breakthroughs and are partners with Volkswagen which should have batteries available before 2030.
Solid State Lithium Ion or Solid State Sodium Ion – These are actively being worked on but not available yet. Expect to see the solid state lithium ion batteries in EV’s by the year 2030 unless something prevents it. The sodium ion type will likely take a bit longer.
PRO’s
- Solid state batteries will have much higher energy density, safety, lifespan, charge rates, and discharge rates.
- This will likely revolutionize the EV world.
CON’s
- Not available yet.
- Cost will likely be very high.
- This will likely revolutionize the EV world.
What type of inverter should you get? There are two main types of AC inverters for solar systems, pure sine wave and modified sine wave. If you only get one for the whole house get a large pure sine wave type. We have one smaller 300 watt pure sine wave type, a larger 2800 watt pure sine wave plus a 2000 watt modified sine wave. If I did it over again I would have never bought the modified sine wave inverter. We don’t use it. I’ve dug in deeper to the information on these and I would not recommend using one. You will likely shorten the lifespan of most things you plug into a modified sine wave by 20-30%. Sometimes things just die the first time you power up. Things run hotter as well. It’s really not worth risking, it isn’t worth the small savings you get using the cheaper inverter. The grid provides a clean pure sine wave, so that is what most people are used to and what AC equipment is built for.
When you go through an inverter you get some loss in efficiency so in my view it’s ideal to use the inverter as little as possible. If you can put most of your things on a 12V DC circuit you don’t have to always be running your inverter or inverters. With a high quality pure sine wave you can get 85-95% efficiency, some are even higher but that’s not as common. With the modified sine wave inverter you can get 75-90% efficiencies. Our 300 watt pure sine wave inverter is probably closer to 95% efficiency, it doesn’t even have a fan and doesn’t produce much heat. We use the 300 watt inverter to charge laptops and batteries. We use a heavy duty (lower frequency) pure sine wave 12V 2800 watt inverter for power tools, laundry machine, and anything else that needs more than 300 watts. If you are running new equipment and smaller motors you would likely be fine getting a “high frequency” pure sine wave inverter. Those are the most common and work for most applications, they are also lighter weight (20 lbs-) and cost less. Sometimes they make more noise though and can have a shorter lifespan. If you are running large motors it is recommended to go with a “low frequency” inverter. They cost more and are heavy (40 lbs+) but they often last longer, are often quieter, and work better for a wide range of tools and appliances. Some of the larger heavy high frequency inverters function a little more like the low frequency ones and might do a great job on older larger motors and such. Another thing to understand is that with many quality inverters you can wire them together in parallel or series. Doing such will increase your amperage in parallel or voltage in series. This option can be very helpful in a situation where you might need high power output, like a large wood shop.
From your battery to your inverter keep your wire lengths short (under 4ft is ideal) and make sure you use a large gauge wire to the inverter. A 2000 watt inverter can run continuously at 166 amps. With that it’s recommended to have 0 or 00 gauge wires for this on a 12V system. You would also want a 200-250 amp fuse on the positive wire as a protection from fire. The easiest is a marine “bolt on” fuse (MRBF terminal fuse).
Some inverter brands worth looking at:
Midnite - Victron - Morningstar - Magnum
Wires and fuses: With 12V systems you will be dealing with large gauge wires and short runs. The lower the amps and higher the volts the thinner the wires and longer runs you can do. Typically you can have thinner longer wires going from your panels to your charge controller, then they will increase in size from charge controller to battery bank. From the battery bank you want large wires to all the components that are higher amps and fuses are highly recommended. Follow the manufacturers recommendation for wire sizes and fuses, if they aren’t included in the instructions you can find the information online for generic sizes for whatever amps and lengths you are doing. You can also use a fuse block to distribute DC power to various appliances or components. Fuses are very important in a solar system. They can protect equipment and prevent fires. If you end up with some faulty equipment or a short (negative and positive wires crossing) that takes place your wires themselves will act as a fuse, and they can heat up to the point of burning up and catching fire. A fuse has a built in weak point that has a lower melt or blow out point than the wire. That makes it so the fuse will melt or break in some way so the circuit will close (be interrupted). This is an essential component to protect everything. For example touching a metal item to both the positive and negative terminals will short your battery out. Do not do this. You can cover the terminal ends with plastic or rubber to help prevent this. If your toaster, or washing machine, or whatever else shorts out and fails in a bad way and you have a fuse in the line the fuse will burn out and prevent any further damage. If you don’t the wires can heat up to the point of sparking, melting, and starting things on fire.
See the chart below for some basics on sizing wires on a 12V system. For 24V and 48V look online for more details. The sizes can drop as the voltage increases because the amperage decreases for the same amount of total power/wattage. For more elaborate or higher wattage systems it can be necessary to increase the voltage of the system.
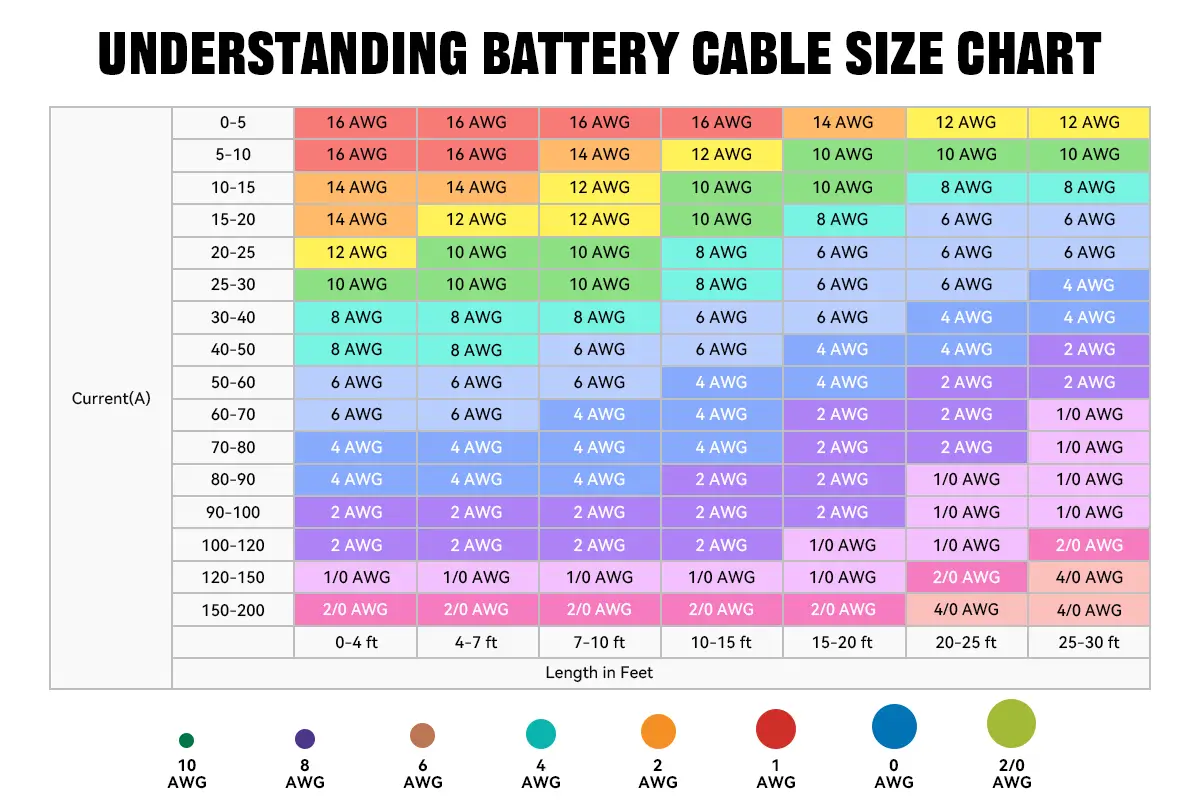
Chart taken from powmr.com go there for more details.
Some optional components might be needed or not depending on different situations. We’ll briefly cover these parts, what they do and why you might want or need them. For convenience I’ll copy the list from above on the optional solar system parts.
- Shunt and Battery Monitor (recommended)
- Combiner Box (often needed, especially for large systems)
- DC to DC converter
- Electrical Distribution Box (Breaker Box)
- Bus Bar (Positive and/or Negative)
- Bolt on Fuse MRBF
- Fuse Block
- Power Pole or similar system
It’s pretty smart to add a shunt and battery monitor to your system. The shunt combined with the battery monitor can give you all sorts of details on your batteries status. It can show you the voltage, the percent of charge, the amps being used, and more. For a super basic setup you may not care to have such information, but for a home or shop that is used regularly it seems pretty essential in my view. But it is optional, you can run a solar system without it and we did for a month or so before installing it.
A Combiner Box is very common and used in most home solar systems. I briefly mentioned above that we ended up using one even though we had a simple 3 panel system. What it does is create a parallel circuit with your solar panels, which will add (or combine) all of the amperage together. When this is done you will need higher gauge wires going out of the combiner box than what is going in. Often what people do is have multiple panels wired together in series increasing the voltage. Then all of those wires will go into the combiner box. With this component you can easily wire together many panels. For an example say you had twelve 300 watt panels in your array, for easy math let’s say they are 30V 10A. Say you wired them together in sets of three in each row in series, giving you 90V 10A. Then you took those four strings and wired them into your combiner box. Out of the combiner box you would have 90V 40A giving you a total of 3600W to wire into your charge controller.
A DC to DC converter is something I do not have but might get someday. They are very useful and sometimes are built into higher quality AC inverters. What it basically does is take your DC voltage and convert it to whatever voltage you want. So if you have a 48V system and you desire to run 12V or 24V components you can do such a thing. Or if you have a 12V system and you want to run a 90V motor you could do that. Some can do a wide range of voltage settings and some are built to only do a single step (such as 12V to 24V only). I’ve thought of many reasons to have one of these but I don’t really need it yet so I’ve put it off. Just want you to know it’s out there and might be useful for you.
You may need an AC Electrical Distribution Box (Breaker Box) for your inverter. Some inverters have outlets built into them, some you can wire directly to outlets and such, and others need a breaker panel of sorts – especially larger inverters. You can buy pre-wired distribution boxes at various online stores. If you are more skilled it doesn’t seem too bad to wire one yourself, but we went with a prebuilt one to make it easier and we aren’t putting in much wiring. If you need a lot of wiring, such as if you want outlets in every room of your house and many appliances you will likely want to build one from scratch or have an electrician do this step for you. If you only need 2-4 or so outlets a prebuilt box would be an easier path and potentially cheaper. This particular device I’ve had a hard time finding outside Ebay and Amazon.
A couple options:
Power Distribution Breaker Box 120V - And another one
To make all your wiring more neat and clean you can add a Bus Bar. This can be used on the positive side and the negative side of your battery wiring. Some are built with both positive and negative to the same bar. This is especially nice to have the more wiring you have. With elaborate wiring setups it becomes nearly impossible to put it all on your battery terminals. With this you will have your battery wire going to the busbar, and then you wire into the busbar instead of to the battery terminal. Even with smaller systems it is nice to have things more tidy with these contraptions. We have one for our grounding as well, it was getting very messy – these can also save in overall wire lengths.
Bus Bars – red – black – white
Fuse Block. There are many fuse blocks or fuse distribution boxes built for boats and RV’s that are nice for 12V and 24V systems. We have one for expansion with 6 fuses that can go up to 100 amps combined. This is nice for wiring lights, phone chargers, laptop chargers for cars, and much more.
Distribution blocks (I’d recommend one with fuses)
Another very useful tool is the Power Pole, SB50/SB90, XT60/XT90 connectors, Daier rocker switches, and more. These are a few systems built for boats, RV’s, robotics, RC’s, and car audio that are very useful for the home and shop. In my view people are limiting themselves somewhat by just thinking of a home solar system as a typical 120V/240V (USA) inverter driven system. There are so many things that can hook into a 12V or 24V system thanks to all those boat and RV folks out there. We have a power pole since it was gifted to us by a couple who used it in their RV years back. All you need to do is add the power pole adapters to the end of your wires, it’s fairly easy. It’s helpful to watch a video or look up tutorials on how to add the clip to your wires, but once you get it down it’s pretty simple. Once you have them attached you can plug them in and out onto your power pole box. With this simple device you can have many things that you can swap around or keep some of them permanently plugged in if you desire. Something nice about these is they have a built in fuse for each line as a nice protection. The SB50 (50amp), SB90 (90amp), XT60 (60amp) and XT90 (90amp) plugs are useful for quickly connecting and disconnecting different medium amp devices. The SB50/90 are easier to connect and disconnect so if you plan on swapping things around with those consider that. If you are dealing with moisture at all the XT60/90 connectors seem a bit tighter and might help with that. Daier builds various “rocker switch panels” that you can connect various DC powered items with little on/off switches on a single panel. As you look around you will find all sorts of innovative and useful tools for the DC side of your solar system.
Daier switch panels and more - How to install Powerpole connectors - Powerpole connectors and more - Anderson Power SB connectors - XT60/90 information Victron Lynx DC Distribution Systems
Example solar system
Lastly I want to go over an example of a solar system you could do. Like mentioned above I’d recommend changing your lifestyle and decreasing your overall need for electricity so you can go with the more simple 12V or 24V system. The cost can get pretty high with a larger battery bank and 48V system. The more robust you go the less worthwhile it is to go off-grid. If you want to stay grid tied it isn’t a terrible idea to just make a basic 12V system with one or two batteries in your garage or shop as an emergency backup system. But it is much cooler to drop the power bill and get off-grid. We have zero monthly bills in our life right now and it is wonderful, join the party!
Note that with many of the components listed here you can find a good or even great deal on these gently used. I’d recommend going with solid name brand components and avoid the cheapest components out there if you want it to last. I will list what we have in our system here with a few alternate options as well. You can also look back at previous segments to think about more options.
Here is our 12V 800 watt system:
Solar Panels: Panels vary a bit in quality and price; we bought three 340 watt Suniva OPT340-72-4-100 panels for about $740 total locally. They aren’t great but good enough for the price. Expect to pay $600-$1,500 for similar or somewhat better panels.
Single Pole Mount: Mount kit, schedule 40 steel 4” and 3” poles, and cement all totaled ~$1,200 This is the mount brand we did a TamaRack solar mount. And here is the specific mount kit we went with. The same site has many variants for different configurations.
- Contact local plumbing supply stores for the schedule 40 or schedule 80 pipe. We ended up buying local 20’ lengths cut to size and kept the leftover pipe for less than it would be buying online with shipping costs.
- Make sure you buy an appropriate mounting kit for your size of panel.
Combiner Box: we bought a mid-grade PowGrow 4 string combiner box ~$150
- This brand can be found on Ebay and Amazon and it works fine enough.
- If you are putting together a much larger array I’d go with a better brand like Midnite Solar.
Charge Controller: Morningstar Tristar MPPT TS-60M ~$800
- Note that this is a great expandable charge controller. It can work with 12V, 24V, or 48V. We got the older model for a significantly lower price but I’ll list current easy-to-find new price here. This one is not the easiest if you plan on going with LiFePO4 batteries because you will have to reprogram it. I have not done it, but it shouldn’t be too challenging with their software linking to a Windows computer. It comes pre-programmed for many other lead acid battery types. If you plan on going with LiFePO4 batteries keep that in mind, it’s recommended to look into this in advance.
- Victron has lower cost options worth considering if you want to save money, or look at used charge controllers.
Battery: Renogy 200Ah AGM battery ~$400.
- You may want to upgrade to a higher quality battery for a longer lifespan.
- You would need a larger battery bank than we have if you wanted to run a refrigerator and/or chest freezer. With 800 watts you could have a battery bank as large as 400 amp hours of usable power or 4.8kWh. This would be four 200Ah AGM batteries or two 200Ah LiFePO4 batteries. With ours we could run an efficient dorm fridge or tiny travel cooler with a freezer compartment, but we’d want to double or more our battery bank for an efficient full size version.
Battery monitor and shunt: Our charge controller came with this as a combo. You can buy one separate from various brands for ~$60-$200.
Powerpole: Ours came free from our neighbor, but they are roughly $80. You will want a distribution box or hub, connectors, and crimping tool. This is optional but useful.
Wires: Many of ours were salvaged from neighbors, if you buy them all new expect to pay roughly $600. The price can vary quite a bit depending on many factors. Napa Auto is a good place to buy large gauge wires with battery terminal ends attached and heat shrink wrapped made to whatever length you need. Keep your high amp wires as short as possible.
- You’ll also likely want a solar MC4 crimping tool kit to extend your solar panel wires to your charge controller or combiner box. (Something like this)
MRBF battery terminal fuse block (bolt on): ~$70
- You will want to use this from your battery terminal to your inverter. We use a double pole version with one going to our 2800W inverter (300A fuse) and one going to our 300W inverter (50A fuse). You want to size your fuses at 25% or more the continuous watt rating expected. So take the amps expected and multiply by 1.25 for your minimum fuse size. Example 2800W inverter / 12V battery = 233A x 1.25 = 291.7 or ~300A. So a 300-350A fuse would be appropriate to put on as your fuse.
- Example double pole bolt on fuse.
- Example of this type of fuse.
Inverter #1: Morningstar 300 watt Suresine ~$300
- We bought one used for just over $100.
Inverter #2: Outback Power VFXR2812A ~$600
- This company has lost their main engineers and has been going downhill. As far as I can tell these inverters have been discontinued, but you can still find them at a great price and it is worth getting but don’t expect warranty fulfillment. An equivalent alternative can cost over $2,000. If you don’t need a lot of power or the “low frequency” type of power you can save a lot with something like this: Victron Phoenix Inverter 12/1200 (~$300).
- The reason we have two inverters is because the 300W one is very efficient and was cheap. We typically never turn off the 300W inverter because it draws so little power when not in use. The 2800W inverter makes an annoying buzz and draws more power, we only turn it on when we need it. If you always need your inverter on you may want it in an area where you will not hear it.
Electrical Box: ~$120
Total system cost ~$5,000 - $6,500 (higher price is with two batteries and higher price on everything.)
If you look around for deals, wait for sales, buy some things gently used, buy discontinued items, scrounge around for some parts, and use only one battery like we do you can do this for closer to $4,000. There are countless extras you will likely be adding to your particular system. The cost can easily go up depending on what you do and what you add.
What you could expect to run with this: Laptops, recharging power tools, washing machine, propane dryer, efficient refrigerator or chest freezer, smaller efficient A/C unit, and many other things. If you were trying to run all of these things at once you will run into problems. You would need to prioritize and conserve with this system but it really can do a lot.
Concluding remarks on this system we use: We enjoy this solar system build and are very happy with it. Of course you can always use more power, but I think it very worthwhile to adapt to a modest system. If you had a very low power bill of only $65 a month it would only take about 8 years to pay this system off entirely with the price point of $6,500. The average household power bill in the USA is closer to $142. So if you could adjust your lifestyle and switch to something like this it would take less than 4 years to pay off. And that would shorten further if you’re system was closer to $5,000 or $4,000. If your power bill is the average $142 per month, you could spend about $17,000 on a solar system and if you went off-grid it would pay for itself in ten years – not too shabby. Another thing to consider with going small and modest with your system – we also save a lot more overall because we aren’t buying lots of things that use electricity. We don’t have a dishwasher, dryer, multiple refrigerators and freezers, air-conditioner, heat pump, television, and countless other electrical devises. So we save money on multiple fronts because of this lifestyle.
I hope you gained something from this writeup if you were able to get through it all. If this helps even one person go off-grid it was worth the time it took to put this together in my view.
And of course there are many more options out there. You certainly don’t have to go with the same brands and equipment I list here, just giving you a starting place with some decent equipment for you to consider on your journey to disconnect from the grid if that is your desire. Some of the newer systems are 72V or even much higher, but I’m not as interested in this personally so I won’t give you many of the details. I don’t care to try and teach what I don’t know or care to know. In my view I don’t see myself going beyond a 24V system for anything I’d care to do. For a group project with a community use workshop of sorts that needs higher power I’d prefer to stick with 48V or lower. If there were any tools or equipment that needed more than what this could provide and it was only run from time to time perhaps a generator could be used. If the costs get too high and the grid is nearby it might just be smarter to use that. But I believe most situations it can be cheaper to go solar for your electric needs. Switch to wood, propane, or diesel for the bulk of your heating and heavy burst mechanical needs.
Download the PDF version of this write-up by clicking on this sentence.
Additional resources:
Here are a few books I found helpful. They are in order of my favorite to least favorite, but I found them all helpful with useful information.
Mobile Solar Power Made Easy! – by William Prowse IV
- Note you can now download his book for free if you submit your email address.
Off Grid Solar Power Simplified – by Nick Seghers
Solar & 12 Volt Power for beginners – by George Eccleston
Here are a couple pretty interesting and fun books on related subjects but not about solar systems.
DIY Lithium Batteries: How To Build Your Own Battery Packs – by Micah Toll
- You can build your own battery banks for solar systems and for many other applications. This book is pretty great in my view. I hope someday to start playing around with this but I have so many other things I’m working on at the moment.
The Ultimate Do-It-Yourself Ebike Guide – by Micah Toll
And here are multiple sources of solar panel and/or battery diagrams, just in case any link dies or different explanations resonate more than another:
altestor - solarray - renogy - solartap - windandsolar - windandsolar #2
If you have questions or need help this forum is active and great. The community is mostly kind and there are many very knowledgeable people willing to help. If you are building your own system and want some tips or assistance this is a great resource.
Solar system components can be bought at many shops, of course Ebay and Amazon have many parts. However a lot of the kits and solar equipment in general from those sites are not that great. Another thing to consider is that Amazon doesn’t really need our business, they account for about 40% of all online retail sales. If we want to keep options available It might be smart to use some of the other suppliers out there. Here are some solar suppliers that seem worthwhile.